Installation guide
The NoShowsVoorspellen.nl software is designed to be easy to install. Whether you work on-premise, in the cloud or with Kubernetes, everything is up and running within 30 minutes.
- About the installation: easier than ever thanks to Docker
- Diagram of the solution
- On-premise installation
- Cloud installation
- Cloud Kubernetes installation
Installation video
About the installation: easier than ever thanks to Docker
The NoShowsVoorspellen.nl software is delivered as a Docker image. This means everything, from the AI model to the web application and optionally the scheduler, is fully preconfigured. You only need to install Docker and Docker Compose on your server or cloud environment, then download and start the image. In cloud environments these are often available by default. You then receive a licence key to activate the software.
All required components, such as Python, libraries and dependencies, are built into the container. This makes the installation consistent, secure and fully platform-independent. Docker also simplifies deployment for teams that do not routinely manage Python environments or application dependencies. The container packages the required components together, so installation involves a small number of configuration steps rather than a separate setup for each dependency.
Benefits of working with Docker
- Easy installation: up and running within minutes, without manual setup.
- Consistent behaviour: the same container runs in every environment without compatibility issues.
- Automatic updates: improvements to the AI model or web app are rolled out easily with an updated image.
- Platform-independent: works seamlessly on Linux and in cloud environments such as Azure or AWS.
- Fast restarts: containers can be started or replaced in seconds, without downtime.
Although Docker also works on Windows via WSL2, I recommend a Linux server for production environments. An Ubuntu server is an easy option, and even a Beelink mini PC running Ubuntu is sufficient. Linux works directly with Docker and therefore delivers the best stability and performance.
The sections below explain the different installation options. Whether you work on-premise, in the cloud or with Kubernetes, the installation stays simple and uniform.
Diagram of the solution
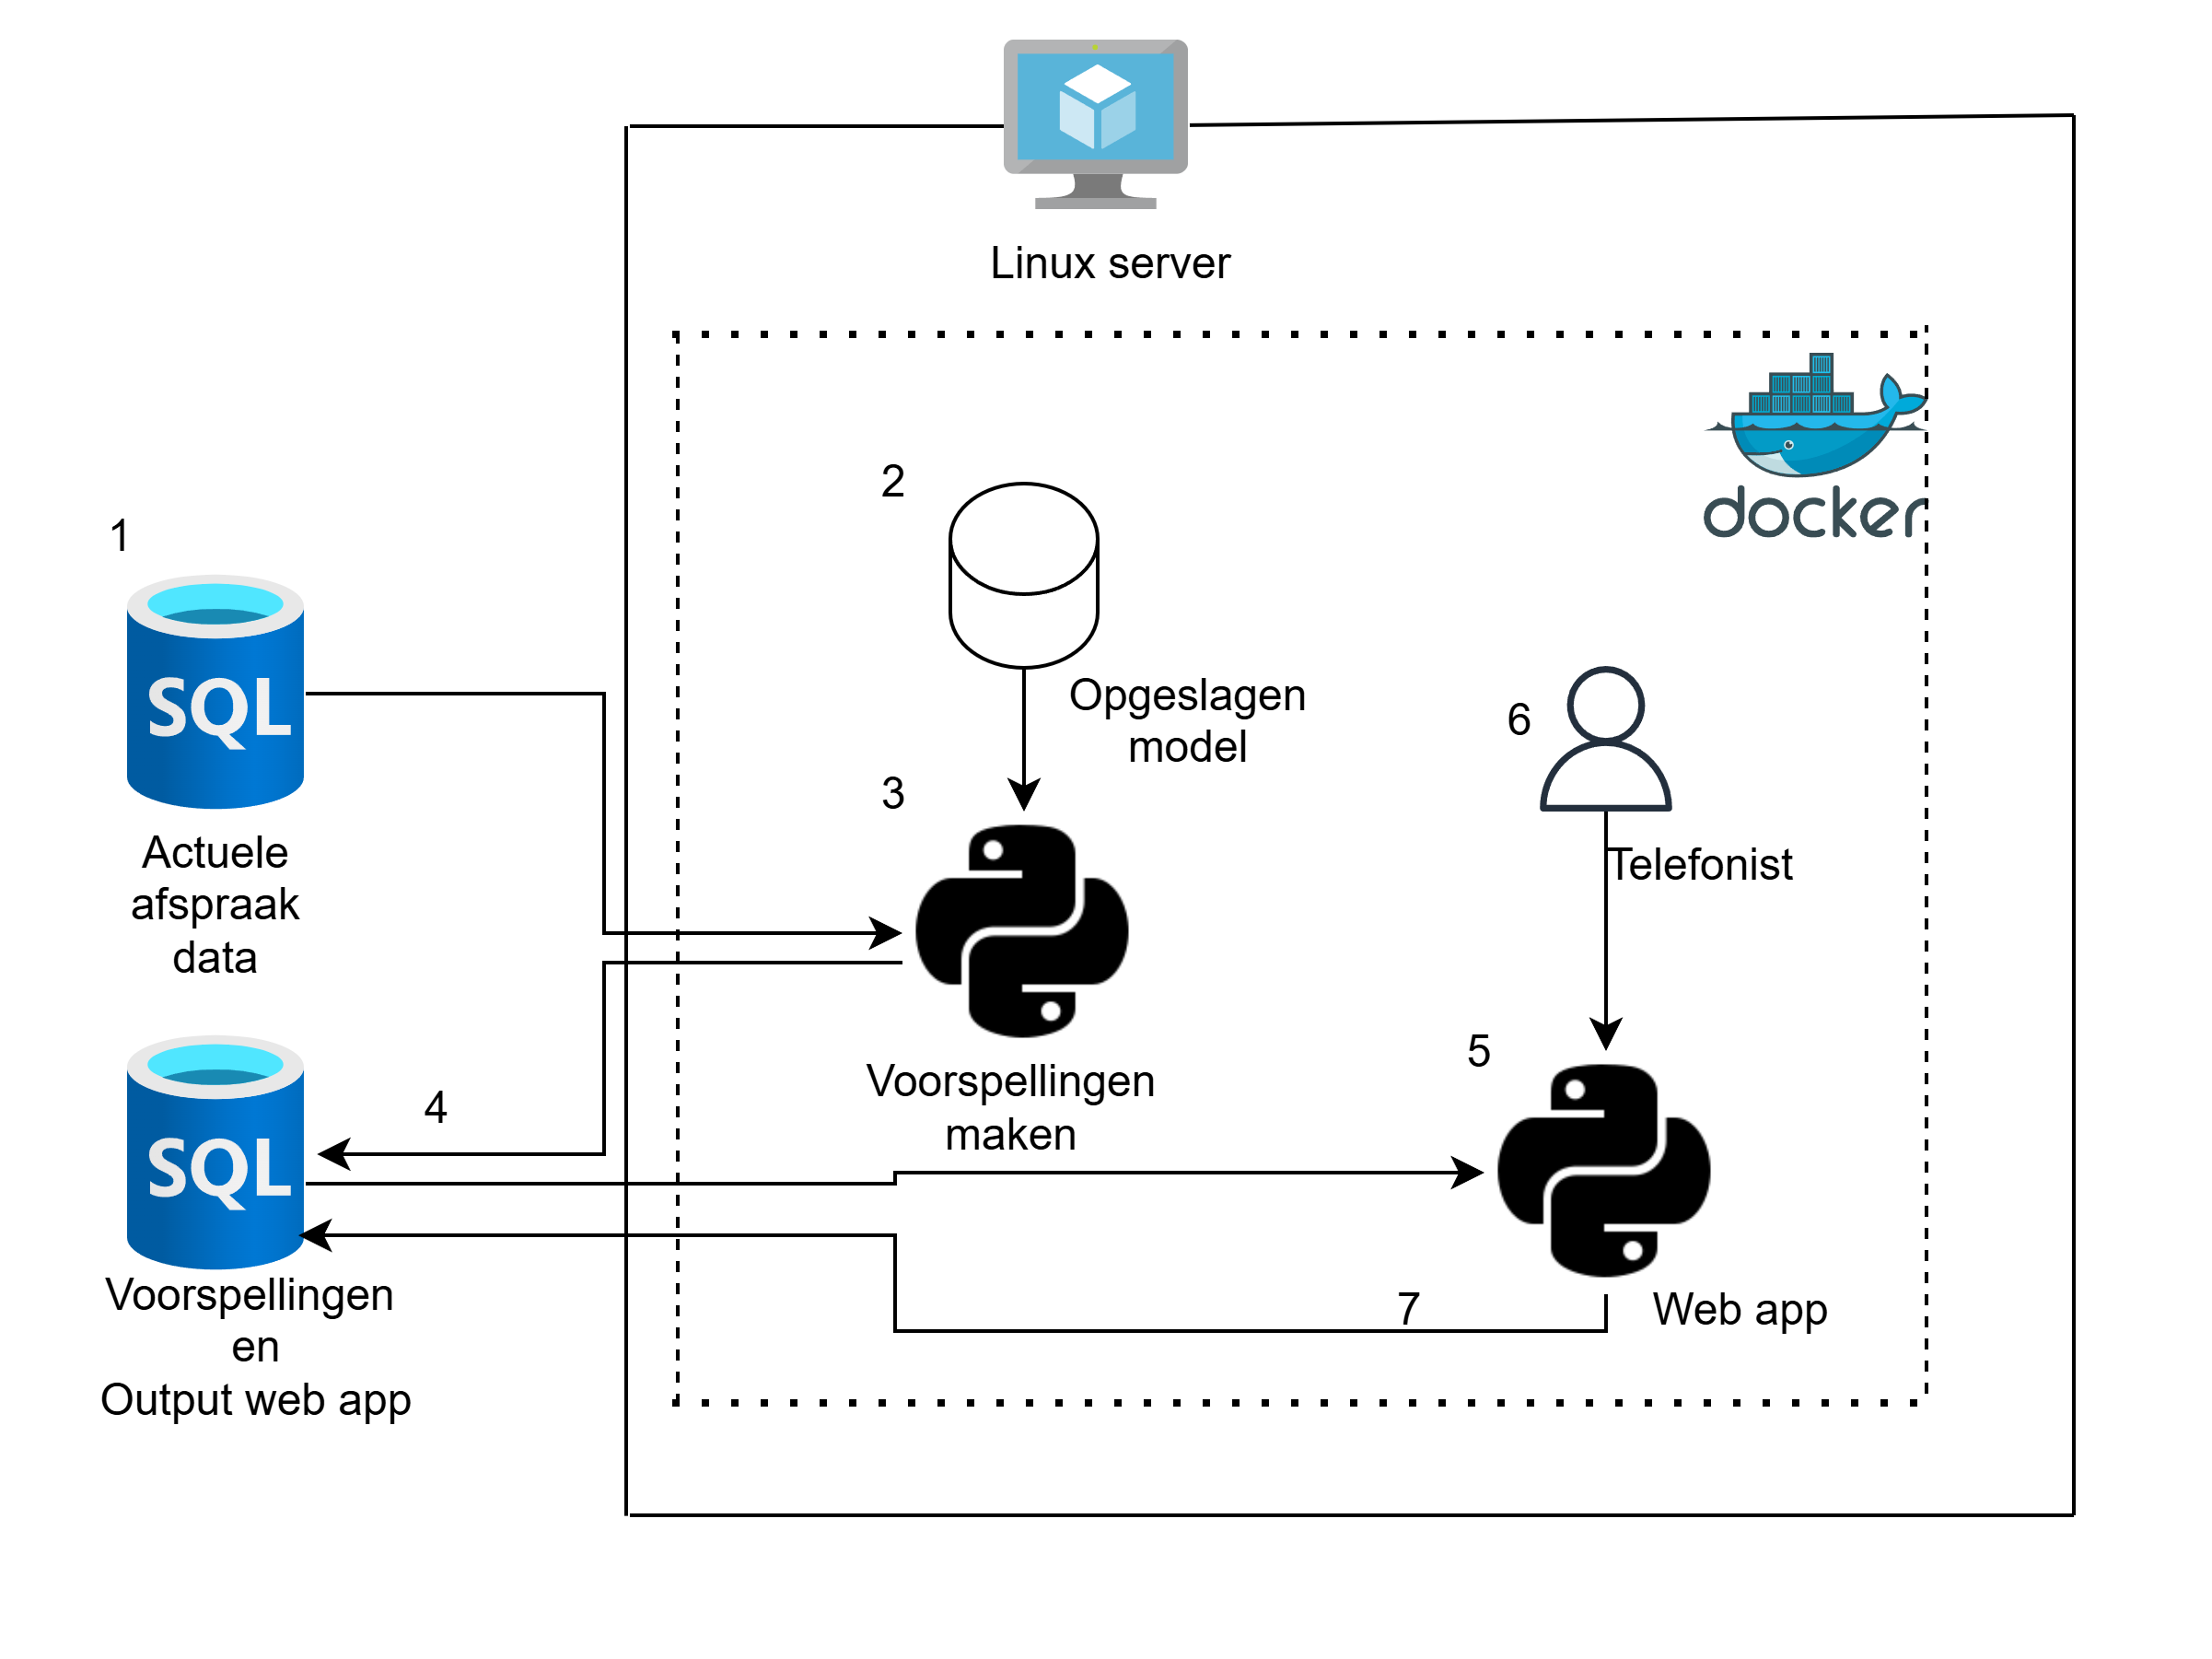
Below is a diagram of the application. This example assumes on-premise SQL databases and an on-premise Linux server. The architecture is fairly similar for a cloud solution, for example on Azure: the SQL databases are replaced by Azure databases, and Azure web services replace the Linux server. As mentioned, thanks to Docker you only need to install Docker and the Docker image. Python and other dependencies are part of the image, which keeps everything simple.
- Appointment data is read in.
- The stored model is loaded.
- Predictions are made with Python.
- Predictions are written back to a database.
- The predicted no-shows are combined with the client's contact information and shown in the web app.
- The caller records whether the client was reminded, and any other possible outcomes are recorded too.
- The caller's records are written back to the database, so effectiveness can be measured.
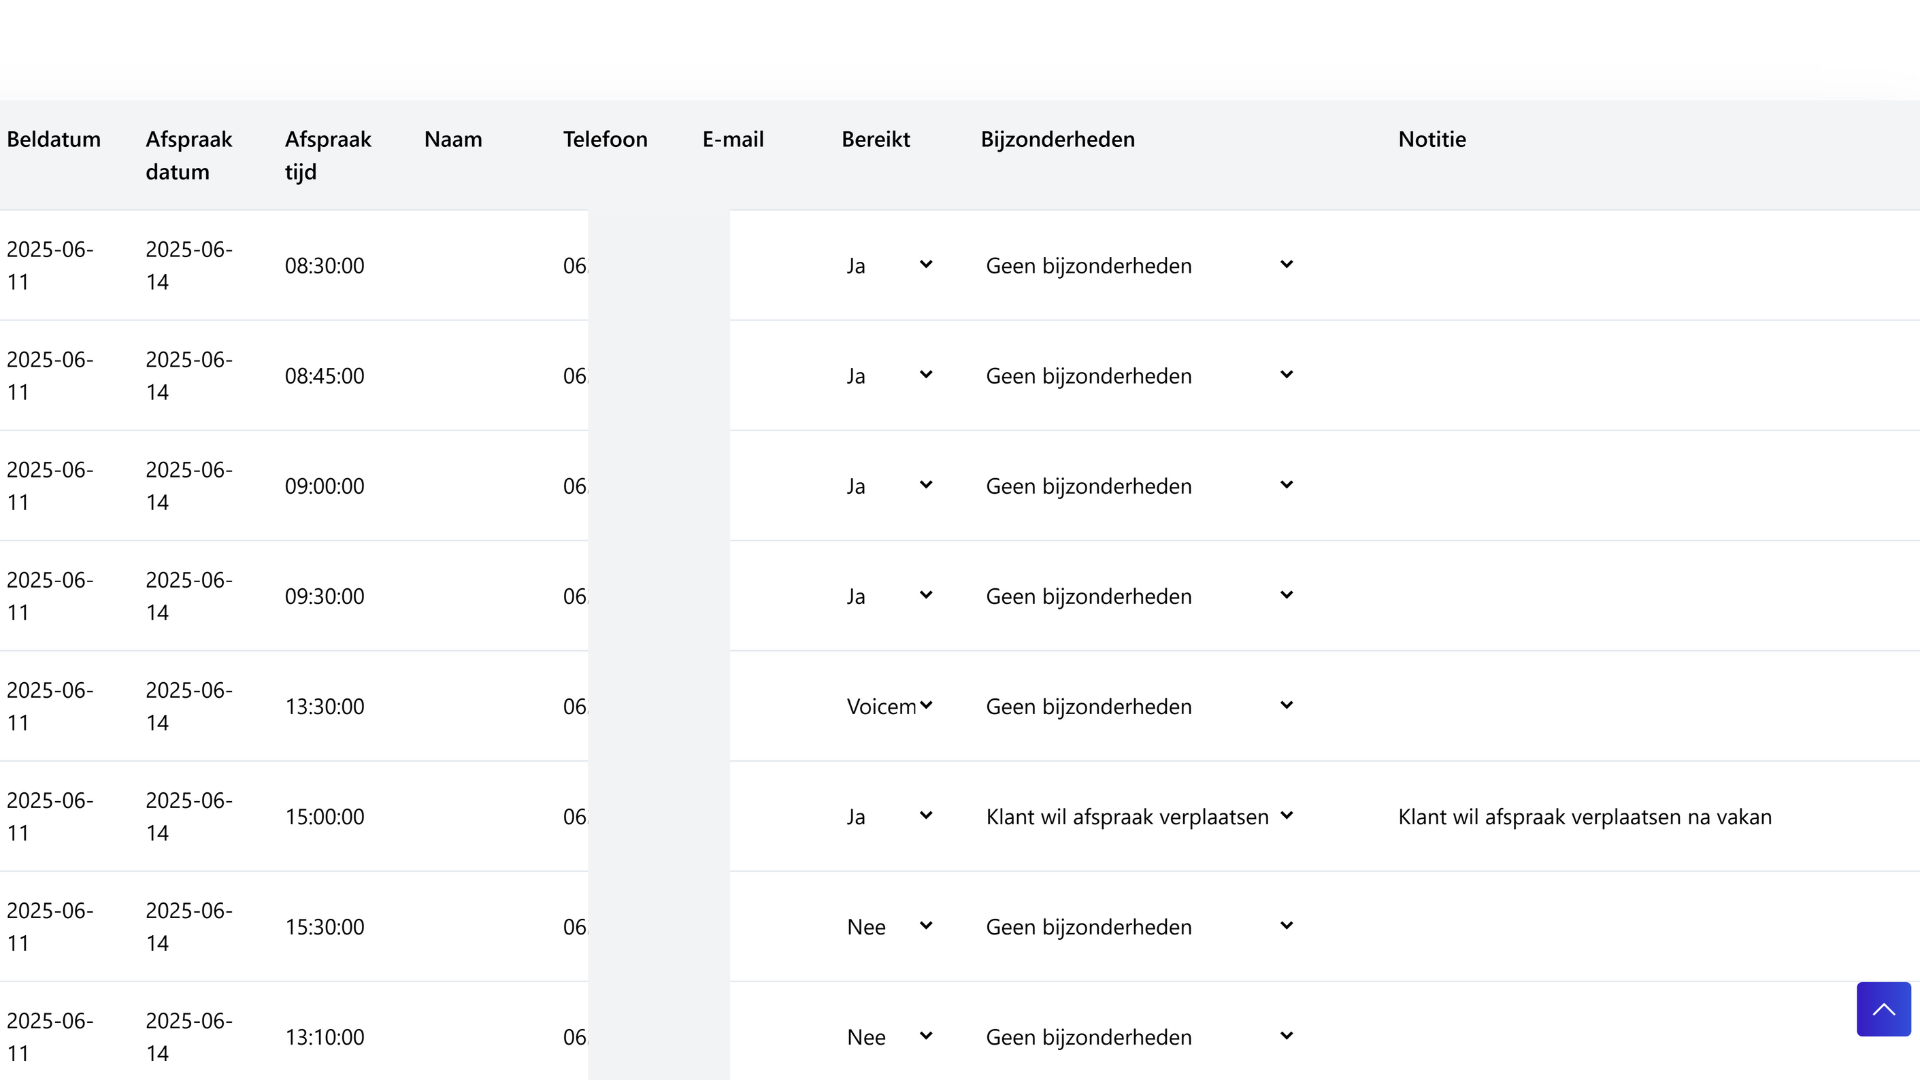
The web app displays predicted no-shows and supports targeted phone follow-up. Staff can record call outcomes and note any relevant circumstances. In one deployment, those notes were also shared with the appropriate departments for follow-up. An example is shown below.
Earlier implementations provided predictions without a web app, leaving each organisation to build its own interface. Because that requires additional development capacity, the enterprise solution now includes a web app for managing phone follow-up in a structured way.
On-premise installation
The on-premise installation is ideal for organisations that manage their own server, or want to keep doing so. The software works seamlessly with Microsoft SQL Server, PostgreSQL or other common databases.
Hardware & OS
A Linux server (e.g. Ubuntu) is sufficient. A compact Beelink mini PC is often powerful enough. You can buy the server or rent one from a hosting provider.
Installation steps
- Pull the Docker image
docker pull ghcr.io/noshowsvoorspellen-nl/noshowsvoorspellen:1.0.0 - Decide whether the web app should be accessible outside the local network
I provide two example
docker-composefiles. If you want callers to be able to log in from outside, simply choose that variant. - Edit the example
.envfile Fill in your database connection, dataset locations and other settings. An example file is included to make this easy. Below is an example of a.envfile.
In this example the database is on-premise. Both ODBC 17 and 18 drivers are supported. It is also possible to read from and write to different database locations. This is useful for separating client data from prediction data.
# Configuration file (.env) for NoShowsVoorspellen.nl

# Database configuration for predictions and the web app
DB_LOCATION=onprem             # options: onprem | azure | aws
SERVER_WRITE=ServerName
DATABASE_WRITE=DatabaseName
USERNAME_WRITE=***username***
PASSWORD_WRITE=***password***
DRIVER_WRITE="ODBC Driver 18 for SQL Server"

# Database configuration for client data (read-only)
DB_LOCATION=onprem             # options: onprem | azure | aws
SERVER_READ=ServerName
DATABASE_READ=DatabaseName
USERNAME_READ=***username***
PASSWORD_READ=***password***
DRIVER_READ="ODBC Driver 17 for SQL Server"
.env configuration file.
A single file configures NoShowsVoorspellen.nl so it can connect to your databases, locally or in the cloud.
- Create or edit the
docker-compose.ymlfile The example below starts two containers: one for the web application and one for running the predictions every day. Both use the same.envfile for their settings.
version: '3.8'

services:
  voorspel:
    image: noshowsvoorspellen/noshowsvoorspellen:1.0.0
    container_name: voorspel-container
    command: python main_voorspel.py
    env_file:
      - .env
    volumes:
      - .model_location_on_server:/app/models/noshow_model.joblib
    restart: "no"

  webapp:
    image: noshowsvoorspellen/noshowsvoorspellen:1.0.0
    container_name: noshow-webapp
    command: uvicorn main:app --host 0.0.0.0 --port 8000
    env_file:
      - .env
    ports:
      - "8000:8000"
    restart: always
docker-compose.yml configuration.
The ./model/ folder contains the AI model file used by the prediction container.
- Start the containers
Within seconds the web app and the prediction service are running.docker compose up -d - Automate daily predictions
Use your own tools (cron, task scheduler, pipeline) or the
noshowsvoorspellen/schedulerimage. Configure it with compose as well and let it run daily.
The installation is usually completed within 30 minutes. No complex setup or dependencies required; everything runs in Docker.
Cloud installation (Azure / AWS / Google Cloud)
Prefer to run entirely in the cloud? That is just as easy. The application works with Azure SQL Database, AWS RDS or Google Cloud SQL.
Installation steps
- Pull the Docker image Use the same image as for on-premise.
- Choose your cloud service
The easiest route is Azure App Service or AWS Elastic Beanstalk with Docker Compose.
Upload the
docker-compose.ymlfile and pass the environment variables through the portal. - Connect to your cloud database
Add the connection string for Azure SQL or RDS to the
.envfile. An example file is included to make this easy. Below is an example of a.envfile.
In this example the database is in the Azure cloud. ODBC 17 and 18 drivers are supported. It is also possible to read from and write to different database locations. This is useful for separating client data from prediction data.# Configuration file (.env) for NoShowsVoorspellen.nl # Database configuration for predictions and the web app DB_LOCATION=azure # options: onprem | azure | aws SERVER_WRITE=ServerName DATABASE_WRITE=DatabaseName USERNAME_WRITE=***username*** PASSWORD_WRITE=***password*** DRIVER_WRITE="ODBC Driver 18 for SQL Server" # Database configuration for client data (read-only) DB_LOCATION=azure # options: onprem | azure | aws SERVER_READ=ServerName DATABASE_READ=DatabaseName USERNAME_READ=***username*** PASSWORD_READ=***password*** DRIVER_READ="ODBC Driver 18 for SQL Server"Example of the .envconfiguration file. A single file configures NoShowsVoorspellen.nl so it can connect to your databases, locally or in the cloud. - Start the containers
This happens automatically through the cloud service, or manually with:
docker compose up -d - Daily predictions Use Azure Logic Apps, AWS Lambda or the included scheduler image to run the predictions every day.
Cloud Kubernetes installation
For larger organisations or DevOps environments, the solution runs easily on Kubernetes.
Overview
- 1 pod for the web app
- 1 pod for the prediction service
- (optional) 1 job for running predictions daily
Installation steps
- Pull the Docker images
kubectl pull noshowsvoorspellen/enterprise:latest - Create a Kubernetes deployment and service
- Configure secrets and configmaps These hold the database connection and dataset locations (similar to the .env file).
- Set up a cronjob for daily predictions This job runs automatically once a day.
- Check the status
kubectl get pods
Thanks to the container architecture, all variants are identical in functionality. Only the infrastructure differs — the installation stays simple.